Ever wondered why some recordings just sing with clarity, depth, and presence, while others sound flat, thin, or muddy? The secret isn't just in the talent, the instruments, or even the most expensive gear. It's in the nuanced application of advanced recording & microphone techniques that transform raw sound into polished sonic art. Moving beyond simply plugging in a mic, this guide will arm you with the expert strategies and insights you need to capture professional-grade audio, whether you're miking a solo acoustic performance or a full orchestral ensemble.
This isn't about guesswork; it's about understanding the physics of sound, the characteristics of your tools, and the subtle art of placement. Get ready to unlock the true potential of your recordings.
At a Glance: Your Blueprint for Sonic Excellence
- Choose the Right Mic: Understand the distinct advantages of dynamic, condenser, and ribbon microphones for different sources and settings.
- Master Stereo Techniques: Learn how XY, Mid-Side, and Decca Tree configurations create immersive soundscapes.
- Perfect Placement: Discover the impact of close vs. distance miking and instrument-specific strategies.
- Tackle Complexities: Get a handle on phase issues, room acoustics, and essential post-production.
- Adapt Your Approach: See how live and studio environments demand different recording tactics.
The Foundation: Understanding Your Tools
Before you even think about placement, you need to speak the language of microphones. Each type is a specialist, designed to excel in particular scenarios.
Dynamic Microphones: The Workhorses of the Stage
Imagine a microphone that laughs in the face of a screaming guitar amp or a thunderous kick drum. That's a dynamic mic.
- How They Work: Sound waves hit a diaphragm attached to a coil, which moves within a magnetic field, generating an electrical signal. It’s a purely mechanical process.
- Built Tough: These mics are incredibly durable, affordable, and can handle extreme Sound Pressure Levels (SPL) without flinching or distorting. This makes them indispensable for loud sources and live performances.
- Pickup Pattern: Most dynamics are cardioid, meaning they pick up sound primarily from the front, rejecting much from the sides and rear. This isolation is a godsend in noisy environments.
- Ideal Use Cases: Think live vocals, drums (especially kick and snare), electric guitar cabinets, and any situation where robustness and high SPL handling are paramount. They're excellent for isolating a specific source within a mix.
Condenser Microphones: The Studio's Sensitive Ears
For detail, nuance, and a wide frequency response, condensers are the undisputed champions of the studio.
- How They Work: A thin, electrically charged diaphragm vibrates against a fixed backplate when sound waves hit it, creating an electrical signal. This delicate mechanism is what gives them their characteristic sensitivity.
- The Power Requirement: Unlike dynamics, condensers need external power – usually "phantom power" (+48V) supplied by your mixer or audio interface, or sometimes a battery.
- Sonic Prowess: They offer a wider frequency response and greater sensitivity, capturing the subtle harmonics and intricate textures that dynamic mics might miss.
- Versatile Patterns: While cardioid is common, many condensers feature switchable patterns, including omnidirectional (captures sound from all directions, great for room ambiance) and bidirectional (picks up front and rear, rejecting sides, useful for interviews or specific stereo techniques).
- Ideal Use Cases: Studio vocals, acoustic instruments (guitars, strings, piano), drum overheads, and anything requiring pristine detail and an accurate sonic picture.
Ribbon Microphones: Vintage Warmth and Silky Smoothness
Ribbon mics offer a unique sonic signature – a natural, warm, and often described as "silky" sound that can be incredibly flattering, especially on harsh sources.
- How They Work: A tiny, corrugated aluminum ribbon suspended in a magnetic field vibrates in response to sound waves, generating a signal. It's an elegant, albeit delicate, design.
- Delicate & Precious: These are the most fragile and often the most expensive of the three types. They are sensitive to loud sounds and air blasts, so handle with extreme care.
- Power Nuances: Ribbons require a high-quality preamp with ample gain and a high-impedance input to prevent noise and distortion, and crucially, they generally don't require phantom power (and in some older models, phantom power can damage them). Modern active ribbon mics do require phantom power for their internal amplification.
- Pickup Pattern: Almost universally bidirectional (figure-eight), capturing sound from the front and rear while rejecting the sides. This pattern is key to their unique applications.
- Ideal Use Cases: Vocals, acoustic guitars, strings, woodwinds, and brass instruments where you want to tame harshness and add a rich, natural character. They excel at capturing the "air" around an instrument.
Beyond the Single Mic: Mastering Stereo Techniques
While a single microphone can capture a source, stereo miking creates a sense of space, width, and immersion that brings recordings to life. It's about painting a sonic landscape.
XY Stereo Technique: Phase Coherent & Focused
The XY technique is a simple yet powerful way to capture a wide, coherent stereo image, often favored for its excellent phase correlation.
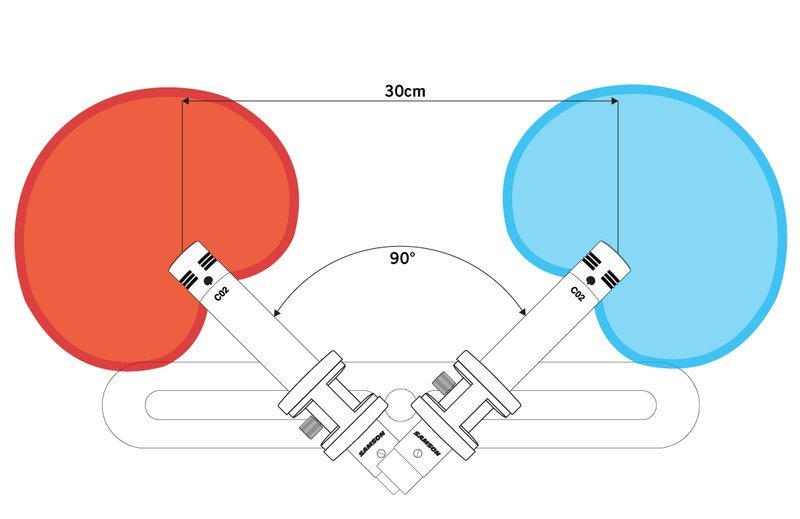
- The Setup: Two cardioid microphones are placed with their capsules as close as possible, usually at a 90-degree angle to each other (though angles can vary between 90-120 degrees depending on desired width). Imagine an 'X' shape.
- The Sound: This configuration provides a strong central image with a natural sense of width. Because the capsules are nearly coincident, phase issues are minimized, making it robust for mono compatibility.
- Perfect For: Acoustic guitars, drum overheads (capturing the entire kit with clear cymbal imaging), piano, and capturing the general ambiance of a room or ensemble.
Mid-Side (MS) Technique: The Post-Production Powerhouse
MS miking offers unparalleled flexibility in the mix, allowing you to adjust the stereo width after recording. It's a favorite for its mono compatibility and control.
- The Setup: You need two microphones: one cardioid ("Mid") pointed directly at the sound source, and one figure-eight ("Side") placed perpendicular to the cardioid, with its nulls pointing at the source.
- The Magic: The "Mid" mic captures the direct sound, while the "Side" mic captures the ambient and spatial information. In post-production, you duplicate the "Side" track, invert the phase of one copy, and pan them hard left and right. Mixing these with the "Mid" track allows you to dial in your stereo width precisely.
- Perfect For: Vocals, acoustic guitars, drum room mics, and any source where you want control over the stereo spread in the mix. Its inherent mono compatibility is a huge advantage.
Decca Tree Configuration: Grand Scale Capture
When you're recording large ensembles like orchestras or choirs, the Decca Tree offers a classic, expansive stereo image with depth.
- The Setup: Three omnidirectional microphones are arranged in a specific triangular configuration. Two mics are typically placed about 30cm (12 inches) apart, forming the front base of the triangle. The third mic is placed in the center, approximately 90cm (3 feet) behind the front two.
- The Sound: This technique captures a very wide, natural soundstage with excellent depth and spatial information, reflecting the acoustics of the recording space beautifully.
- Perfect For: Orchestras, large choirs, and classical ensembles where capturing the full sonic environment and instrumental spread is crucial.
Other Stereo Methods: Expanding Your Horizons
Beyond these staples, several other techniques offer unique sonic characteristics:
- A-B Stereo: Uses two spaced omnidirectional or cardioid microphones to capture a wider, more diffuse stereo image, often with excellent low-end response. Requires careful distance calculation to avoid phase issues.
- Blumlein Stereo: Employs two bidirectional (figure-eight) microphones crossed at 90 degrees, similar to XY but capturing sound from front/rear instead of just front. Delivers a very natural, spacious sound, excellent for room ambiance.
- ORTF Stereo: A near-coincident technique developed by French broadcasters, using two cardioid microphones spaced 17 cm apart at a 110-degree angle. It offers a good balance of phase coherence and stereo width, mimicking human hearing.
Mastering these methods involves not just the setup but a keen ear for proximity effect (the boost in low frequencies when a directional mic is close to a source) and careful gain staging to prevent distortion.
The Art of Placement: Capturing the Source
Microphone placement is where theory meets practice. A subtle shift of an inch can dramatically alter the captured sound.
General Cardioid Mic Placement: The "Sweet Spot"
For most cardioid microphones, the general rule is to aim the microphone directly at the sound source, typically within 6-12 inches. This distance is a starting point, not a rigid rule. Experimentation is key; move the mic around the source, listening for how the tone changes. A small shift can reveal a "sweet spot" that captures the instrument's best characteristics.
Close Miking: Directness and Isolation
Close miking involves positioning the microphone very near the sound source, often within an inch or two.
- The Goal: To capture a direct, intimate sound with minimal room ambiance and maximum isolation from other instruments. This is vital in situations where you need to control individual elements in a dense mix.
- Common Uses: Drums (snare, toms), guitar amps, individual vocals in a busy arrangement.
- Pitfalls: Be wary of the proximity effect, which can make things sound boomy, and potential phase cancellation if using multiple close mics without proper alignment. Angle and distance are your friends here.
Distance Miking: Room Tone and Natural Reverb
Distance miking places the microphone further away from the sound source, sometimes several feet or even across a room.
- The Goal: To capture the natural acoustics of the room, adding a sense of space, depth, and reverb to the recording. This technique allows the sound waves to fully develop before reaching the microphone.
- Common Uses: Orchestras, choirs, capturing drum room sounds, or adding natural spaciousness to an acoustic guitar or vocal.
- Considerations: The room's acoustics become paramount. A poorly treated room will sound messy; a well-treated one will sound glorious.
Instrument-Specific Strategies: A Pro's Playbook
Different instruments demand different approaches. Here's a cheat sheet for common recording scenarios:
Vocals: The Heart of the Song
- Microphone of Choice: A large-diaphragm condenser microphone is typically the go-to for studio vocals, offering warmth, detail, and a broad frequency response that flatters most voices.
- Placement: Position the mic 6-8 inches from the singer's mouth, often slightly above their mouth and angled downwards. This helps minimize plosives and sibilance while capturing the chest resonance.
- Essential Tools: Always use a pop filter to block harsh "p" and "b" sounds, and a shock mount to isolate the microphone from vibrations transferred through the stand.
- Pro Tip: Encourage the singer to move naturally rather than staying rigidly in one spot. Sometimes, a slight movement off-axis can yield a more natural, less aggressive sound.
Drums: Power and Precision
Drums are a multi-mic endeavor, requiring a strategic combination of mic types and placements.
- Kick Drum:
- Mic: A dynamic microphone designed for kick drums (e.g., Shure Beta 52A, AKG D112).
- Placement: Inside the drum, near the beater for punch and attack; or outside the resonant head for more boom and low-end rumble. Many engineers use both.
- Snare Drum:
- Mic: A dynamic microphone (e.g., Shure SM57).
- Placement: Above the drum, pointing towards the center for crisp stick attack, about 1-2 inches from the rim. Some engineers add a second mic underneath, out of phase, to capture snare wire rattle.
- Toms:
- Mics: Dynamic microphones.
- Placement: Above each tom, pointing towards the center of the head for a full, resonant tone.
- Overheads (Cymbals & Kit Image):
- Mics: Two small or large-diaphragm condenser microphones.
- Placement: Positioned above the cymbals, angled towards the center of the kit. XY, ORTF, or A-B stereo techniques are common to capture a balanced stereo image of the cymbals and the overall kit. Ensure the distance from the snare to each overhead mic is identical to minimize phase issues.
Acoustic Guitar: Capturing Intimacy
- Microphone of Choice: A small-diaphragm condenser microphone is often preferred for its accurate transient response and clear detail.
- Placement: Start 6-12 inches from the guitar, pointing towards the 12th fret. This captures a balanced sound without the boominess of the soundhole or the harshness of the strumming near the bridge. Slightly off-axis placement can reduce finger noise or pick attack.
- Stereo Option: For a richer sound, use a second microphone positioned at a different angle or distance – perhaps aimed towards the bridge for more attack, or further back to capture room ambiance. An XY or Mid-Side setup can be excellent here.
Bass Amp: Low-End Authority
- Microphone of Choice: A robust dynamic microphone (e.g., Shure Beta 52A or Sennheiser MD421) is ideal for capturing the bass amp's full, punchy sound.
- Placement: Position the mic close to the speaker cone, experimenting between the cone's center (more attack) and the edge (more warmth).
- DI Box Option: For a clean, balanced signal, always consider using a Direct Injection (DI) box to record the bass directly into your mixer or audio interface. Combining the DI signal with the miked amp signal offers incredible flexibility in the mix.
Piano: Grandeur and Detail
- Microphone of Choice: Condenser microphones are essential for capturing the piano's wide dynamic and frequency range.
- Placement (Grand Piano): Position two condenser microphones above the hammers, one focusing on the low strings and the other on the high strings, for a bright, clear stereo image. You might experiment with an XY or A-B stereo pair inside the lid.
- Placement (Upright Piano): Open the top lid and place two condensers a few feet above, or place mics at the back, close to the soundboard for a warmer, more resonant tone.
Guitar Amplifiers (General): The Rock Standard
- Primary Mic: Place a dynamic microphone (e.g., Shure SM57) close to the speaker cone, experimenting with the center (brighter) and the edge (warmer).
- Adding Dimension: For a more complex and larger-than-life sound, add a condenser microphone at a distance (e.g., 3-5 feet) in the room to capture ambiance. You can then blend this "room mic" with the close-miked sound in your mix.
Brass Instruments: Taming the Edge
- Microphone of Choice: A dynamic microphone or a ribbon microphone is excellent. Ribbons can be particularly flattering, smoothing out any harshness.
- Placement: Position the microphone slightly off-axis from the bell, usually 12-24 inches away. Aiming directly into the bell can sound overly aggressive or shrill. Off-axis capture retains warmth while avoiding an overly piercing tone.
Refining Your Sound: Advanced Concepts & Post-Production
Even with perfect placement, there are still layers of refinement to achieve truly professional results.
Conquering Phase Issues: The Silent Killer of Sound
Phase problems are insidious. They can cause your recordings to sound thin, hollow, or lacking in punch, often without you immediately realizing why.
- The Cause: Phase issues occur when recording with multiple microphones on a single source (e.g., a drum kit, a guitar amp with a room mic). Sound waves reach different microphones at slightly different times, causing frequencies to cancel each other out when combined.
- The Solutions:
- The 3:1 Rule: When using multiple mics, the distance between any two microphones should be at least three times the distance from each microphone to its sound source. This reduces phase cancellation.
- Physical Alignment: When miking a single source with multiple mics, ensure the capsules are as close as possible to equidistant from the source.
- Polarity Switch: Many preamps and mixers have a "phase" or "polarity" switch (represented by a Ø symbol). Flipping this can instantly correct phase issues by inverting the waveform of one microphone.
- Time Alignment: In your DAW, you can often nudge tracks by milliseconds to align their waveforms visually, correcting subtle phase discrepancies.
- Careful Selection: When using multiple mics, using microphones with the same polar pattern can sometimes simplify phase management.
Taming Room Acoustics: Your Recording Environment Matters
The room you record in is arguably as important as the microphone itself. Its acoustics significantly affect sound quality.
- The Impact: Untreated rooms can cause excessive reverb, flutter echoes, standing waves, and overall muddy recordings. The mic picks up not just the instrument, but the room's reaction to it.
- The Solutions:
- Choose the Right Mic for the Room: In a highly reflective room, a directional cardioid mic will pick up less room sound than an omnidirectional one. In a great-sounding room, an omni mic can be your best friend.
- Strategic Positioning: Move the microphone away from parallel walls or corners, which can exacerbate reflections. Pointing a directional mic into a corner can sometimes tame reflections.
- Boundary Microphones: For capturing a large area or minimizing direct reflections from a floor/table, a boundary microphone (or PZM mic) can be effective.
- Acoustic Treatment: This is the ultimate solution. Implement sound-absorbing panels (bass traps, broadband absorbers) to control reflections and reverberation. Diffusers can also be used to scatter sound, creating a more natural and balanced sound field. Even simple solutions like thick blankets, mattresses, or heavy curtains can make a difference in a pinch.
Essential Post-Production Techniques: Sculpting Your Sound
Even the best recording benefits from careful post-production. These tools are not just for fixing mistakes but for enhancing and shaping your sound.
- Equalization (EQ): This allows you to adjust the frequency balance of your recording, boosting desirable frequencies (e.g., clarity in vocals) and cutting undesirable ones (e.g., muddiness in bass, harshness in cymbals). It's crucial for cleaning up your sound and helping instruments sit together in a mix.
- Compression: Compression reduces the dynamic range of a signal, making the quiet parts louder and the loud parts quieter. This creates a more consistent, "glued together" sound, which is vital for vocals, drums, and ensuring instruments don't get lost or suddenly jump out. Use it judiciously to avoid squashing the life out of your sound.
- Reverb and Delay: These time-based effects add depth, space, and a sense of environment to your recordings. Reverb simulates the natural reflections of a room, while delay creates echoes. They can make an instrument sound larger, more distant, or simply more "finished." Always use these as sends/returns on an auxiliary track to avoid stacking effects directly on individual instrument tracks.
Live vs. Studio: Adapting Your Approach
The goals and constraints of live sound are vastly different from those of studio recording, demanding distinct strategies.
Live Settings: Performance-First Focus
In a live environment, the priority is often clear, robust sound that fills the venue, prevents feedback, and serves the performance.
- Windscreens: Absolutely essential, especially outdoors or in windy conditions, to reduce wind noise and plosive sounds. They are also hygiene protectors for vocalists.
- Feedback Elimination: This is the bane of live sound.
- Strategic Placement: Position microphones behind the main speakers (monitors and FOH) to prevent sound from the speakers re-entering the mic.
- Directional Mics: Rely heavily on cardioid and supercardioid microphones for their excellent off-axis rejection.
- EQ Adjustments: Use graphic or parametric EQs to identify and cut problematic feedback frequencies. Notch filters can be very effective.
- Soundcheck Protocols: A thorough soundcheck isn't a luxury; it's a necessity. It allows engineers to identify and resolve microphone issues, set gain levels, dial in preliminary EQ, and establish monitor mixes before the audience arrives. This is where you prevent problems rather than react to them.
Studio Settings: Precision and Perfection
The studio offers controlled environments, allowing for meticulous attention to detail and sonic sculpting.
- Layering Vocals: A common studio technique involves recording multiple takes of the same vocal line (doubling, harmonies, ad-libs). Layering these tracks can create a fuller, richer, more impactful vocal sound.
- Room Treatment: In the studio, dedicated acoustic panels, bass traps, and diffusers are used to create a balanced, neutral listening and recording environment. This controls reflections, eliminates flutter echoes, and ensures that the microphone captures the instrument, not just the room's imperfections. Explore the Temple of Boom for more on creating the perfect sonic space.
- Using Multiple Microphones: Beyond stereo techniques, studios frequently combine different microphone types on a single source – for example, a dynamic mic on a guitar amp for punch and a ribbon mic for warmth and air – blending their unique tonal qualities in the mix to create a truly composite sound. This allows for unparalleled sonic versatility.
Your Next Steps to Recording Mastery
You've explored the diverse world of advanced recording & microphone techniques, from selecting the right mic for the job to nuanced placement strategies and critical post-production insights. This knowledge is your foundation.
Now, it's time to apply it. The journey from good sound to great sound is one of continuous experimentation and attentive listening. Don't be afraid to try unconventional placements, to combine different microphone types, or to spend hours simply moving a mic around an instrument until you hear that magical "sweet spot."
Every room, every instrument, and every performance presents a unique challenge and an opportunity to create something truly special. So, plug in, set up, and start listening with a critical ear. The power to elevate your sound quality is now literally in your hands.