You've invested in top-tier microphones, pristine preamps, and the latest digital audio workstation. Your gear list reads like a dream. Yet, your recordings still sound… muddy. Unclear. Lacking that professional polish. The culprit, more often than not, isn't your expensive equipment. It's your acoustic environment.
The truth is, the way sound behaves in your recording space—how it bounces, absorbs, and spreads—impacts your recording quality more profoundly than any high-end compressor or vintage mic. Master your studio's acoustics, and you'll unlock clearer recordings, slash your post-production time, and boost your creative flow. Ignore them, and you’ll forever be battling room-induced issues, chasing phantom problems in your mix that originated long before you even hit "record."
This isn't about building a million-dollar studio overnight. It's about understanding the fundamental principles of sound and applying smart, strategic treatments that transform your space into a true listening and recording haven. Think of this as your essential guide to creating an acoustic environment that serves your craft, rather than hindering it.
At a Glance: Crafting Your Ideal Studio Sound
- Acoustics are paramount: Your room's sound quality matters more than your gear.
- Know your waves: Sound reflects, absorbs, and diffuses. A balanced room uses all three.
- Target reflections: Absorb sound at "first reflection points" to clean up your sound.
- Don't over-absorb: Diffusers help create a natural, spacious feel without killing the room.
- Tame the bass: Bass traps are critical for controlling low-frequency buildup, especially in corners.
- Layout matters: Proper monitor placement and ergonomic design are key for accuracy and comfort.
- Soundproofing vs. Treatment: Soundproofing blocks noise in/out; acoustic treatment manages sound within the room.
- Invest wisely: Good acoustics save time and money in the long run.
Why Your Room is the Unsung Hero (or Villain) of Your Recordings
Imagine trying to paint a masterpiece in a room with distorted lighting. You'd never truly see your colors accurately. Studio acoustics are no different. Your room dictates how your ears (and microphones) perceive sound. If that perception is skewed by uncontrolled reflections, standing waves, or resonant frequencies, every creative decision you make – from mic placement to EQ settings – will be based on a flawed representation of your audio.
Poor room acoustics manifest as:
- Muddy Recordings: Overlapping reflections blur transients and clarity.
- Unclear Mixes: Bass buildup makes low-end decisions unreliable.
- Fatiguing Listening: Constant sonic anomalies wear down your ears, leading to shorter, less productive sessions.
Conversely, a well-treated acoustic environment offers: - Improved Clarity: Managed reflections mean instruments and vocals sit distinctively in the mix.
- Reduced Post-Production: Less time spent fixing room-induced issues.
- Enhanced Productivity: A more accurate, comfortable listening experience helps you make better decisions faster.
The best time to think about sound design? During the early planning stages of a build. But even established spaces can be dramatically improved with strategic acoustic interventions.
Decoding Sound: The Three Ways Waves Interact with Your Space
To truly understand how to treat your room, you first need a grasp of how sound waves behave once they leave your speakers or an instrument. It's all about how they meet surfaces.
1. Reflected Waves: The Echo Chamber Effect
When sound waves hit a hard, flat surface (like a bare wall, ceiling, or even a desk), they bounce right off, much like a ball hitting a wall. These are reflected waves.
- The Problem: Uncontrolled reflections cause echoes, excessive reverberation (the "wash" of sound after the original source stops), and phase cancellations that make your recordings sound muddy and undefined. Imagine trying to understand someone talking in a large, empty gymnasium – that's the effect of too many reflections.
- What to do: You want to manage these reflections, not eliminate them entirely. This is where absorption and diffusion come in.
2. Absorbed Waves: Taming the Wild Reverb
Absorbed waves are sound energy converted into heat. This happens when sound waves penetrate porous, soft, or fibrous materials. Think of it like a sponge soaking up water.
- Materials: Common absorptive materials include acoustic foam, cotton, fiberglass, and mineral wool. The thicker the material, the more effectively it absorbs lower frequencies.
- The Benefit: Absorption reduces the overall sound power in a room and shortens reverberation time, leading to a "drier," more controlled sound.
- The Pitfall: Over-absorption can create a "dead" or "anechoic" sound, which feels unnatural and can be fatiguing. A balanced approach is key.
3. Diffused Waves: The Natural, Spacious Sound
Diffused waves are sound waves scattered in many different directions. Instead of a direct reflection, the sound energy is broken up and spread around the room.
- The Benefit: Diffusion creates a more natural, spacious, and "airy" sound without removing sound energy. It helps to break up problematic "hot spots" (areas of excessive reflection) and "dead spots" (areas of over-absorption). It also tackles standing waves and resonant frequencies, which can cause specific notes to boom or disappear.
- Ideal Rooms: Rooms with non-parallel surfaces (like slanted walls) naturally offer some diffusion. In typical rectangular rooms, diffusers are a must for preventing a boxy sound. A balanced room skillfully combines absorption and diffusion treatments for accurate, pleasant acoustics.
Essential Acoustic Treatment Elements: Your Toolkit for Clarity
Now that you know how sound behaves, let's talk about the specific tools you'll use to shape your acoustic environment.
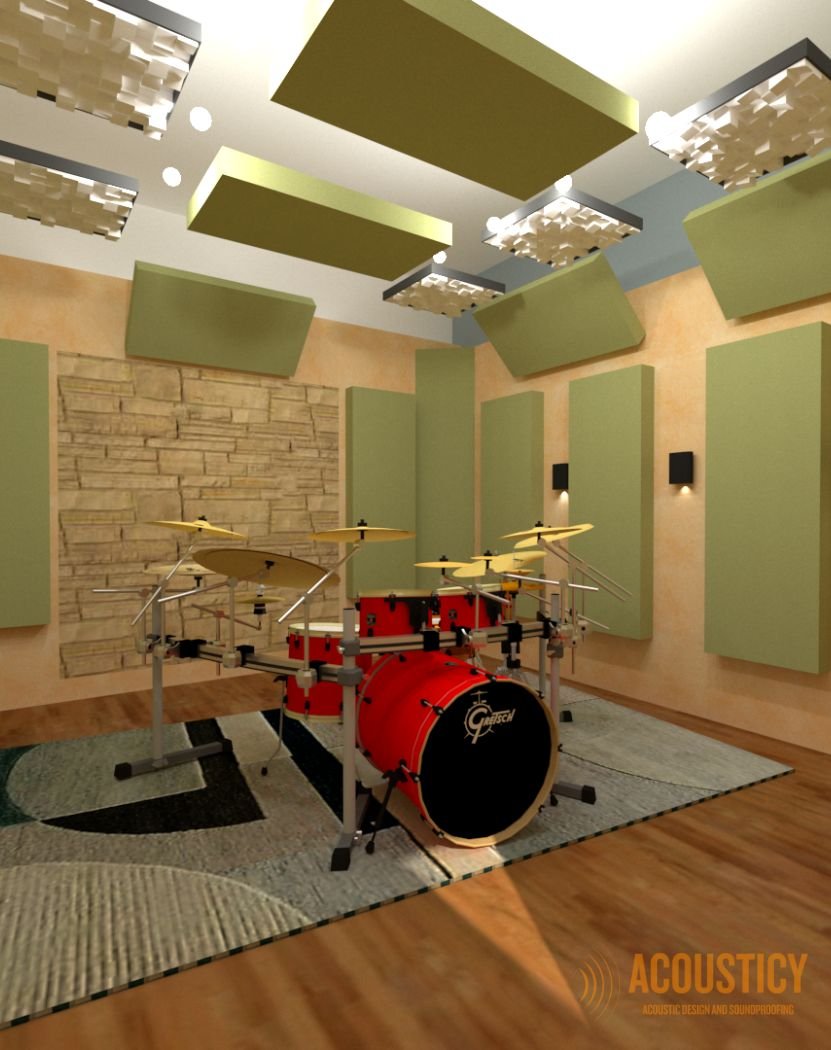
1. Sound Absorbers (Acoustical Panels): The Clarity Keepers
These are your primary weapons against unwanted reflections. Made from light, soft, porous materials, sound absorbers convert sound energy into heat, reducing reverberation and echo.
- Materials of Choice: Fiberglass, mineral wool, and specialized acoustic cotton are highly effective, especially when thick (2-4 inches). Acoustic foam is a budget-friendly option, but generally less effective at lower frequencies than fibrous materials. Wood wool panels offer both absorption and a visually pleasing texture.
- Strategic Placement: First Reflection Points: This is the golden rule of absorption. First reflection points are the spots on your walls and ceiling where sound from your monitors bounces directly to your listening position.
- The Mirror Trick: To find them, sit in your usual listening position. Have a friend slide a mirror along the wall between your monitor and your ear. Wherever you see the reflection of your speaker in the mirror, that's a first reflection point. Mark it! Do this for both speakers, on both side walls and the ceiling.
- Other Key Areas: Also place absorbers on large, flat surfaces, directly above your listening position on the ceiling, and consider using thick carpets or rugs on hard floors.
2. Diffusers: Adding Air and Naturalness
Diffusers are designed to scatter sound waves, creating a sense of spaciousness and preventing the "dead" or overly sterile sound that can result from too much absorption. They break up problematic reflections without eliminating the sound energy itself.
- Types of Diffusers:
- Quadratic Residue Diffusers (QRDs): Often look like a series of varying-depth wells, excellent at scattering sound evenly.
- Skyline Diffusers: Resemble a city skyline, offering two-dimensional diffusion.
- Barrel Diffusers: Curved surfaces for broader, more natural scattering.
- Pyramid Diffusers: Also scatter sound effectively.
- Placement for Impact:
- First Reflection Points: Diffusers can be used here, often alternating with absorbers, to maintain some liveliness in the room.
- Rear Wall: Behind the listener, diffusers are excellent for breaking up reflections that would otherwise return directly to your ears, creating a more enveloping and accurate soundstage.
- Front Wall: Less common, but can be useful to subtly enhance depth.
3. Bass Traps: Conquering the Low-End Rumble
Low frequencies (bass) are notoriously hard to control. Standard acoustic panels struggle to absorb longer bass waves. This is where bass traps come in – specialized absorption for the bottom end. Bass buildup is a major cause of muddy mixes, making bass frequencies sound boomy, undefined, and misleading.
- Types of Bass Traps:
- Porous Absorbers: Thick panels made from dense fiberglass, mineral wool, or specialized acoustic cotton, often 4, 6, or even 8 inches thick. Wedge-shaped traps are perfect for corners.
- Diaphragmatic (Membrane) Traps: These typically consist of a sealed box with a vibrating membrane. They are highly effective at absorbing very low frequencies by converting sound pressure into kinetic energy within the membrane.
- Crucial Placement: The Corners: Bass waves tend to gather and intensify in the corners of a room, both wall-to-wall and wall-to-ceiling corners.
- Why Corners? This is where sound pressure is highest for low frequencies, making corners prime locations for bass trap installation. Fill as many corners as possible, from floor to ceiling, for maximum effect.
- Direct or Gapped: Bass traps can be installed directly into corners or placed with an air gap behind them to increase their effectiveness for even lower frequencies.
Optimizing Your Workspace: Studio Layout & Monitoring Sweet Spots
Beyond treating the room itself, how you arrange your gear and listen to your sound has a massive impact on accuracy and workflow.
Room Shape: The Foundation
- Rectangular or Square Rooms: These are generally easier to treat acoustically. Aim for dimensions that avoid perfect squares or cubes, as these can exacerbate standing wave issues, leading to uneven frequency response.
- Irregular Shapes: While challenging, irregular rooms can be tamed with a smart combination of diffusers and absorbers. The goal is always to minimize problematic reflections and standing waves.
Studio Monitor Placement: The Soundstage
Your studio monitors are your primary sonic window. Proper placement is non-negotiable for accurate stereo imaging and frequency balance.
- Nearfield Monitors: Designed for close-range listening (typically 3 to 5 feet from you). They minimize the influence of room acoustics by having sound reach your ears before significant reflections.
- Midfield Monitors: Intended for slightly longer listening distances (5 to 10 feet).
- The Equilateral Triangle: Regardless of type, both monitors and your head should form an equilateral triangle. Angle the monitors directly towards your listening position to create a "sweet spot" where the stereo image is balanced and precise.
- Ear Level & Isolation: Place monitors at ear level, with the tweeters pointed directly at your ears. Use isolator pads or stands to decouple them from your desk or floor. This prevents vibrations from transferring and coloring the sound.
Equipment Placement & Workspace Flow
Think about ergonomics and efficiency. You want to focus on creating, not fumbling.
- Centralize Your Core: Your mixing console or DAW workstation should be central to your listening position. Keep your mouse, keyboard, and primary control surfaces within easy reach.
- Outboard Gear: Position frequently used outboard gear (compressors, EQs, effects) within arm's reach.
- Rack-Mounted Equipment: Keep rack gear near your console but avoid placing it directly between your speakers and your listening position, as it can cause unwanted reflections. Be mindful of electromagnetic interference from power supplies; keep them away from sensitive audio cables where possible.
- Cable Management: This is often overlooked but crucial. Use cable trays, conduits, and velcro ties to keep cables organized and off the floor. Not only does this look professional, but it also reduces tripping hazards and potential signal interference.
- Ergonomics First: Invest in comfortable, adjustable furniture. An ergonomic chair with lumbar support and a height-adjustable desk are game-changers for long sessions. Designate clear zones for recording, mixing, and editing, ensuring clear pathways and a symmetrical room layout to avoid uneven reflections that can throw off your stereo image. A dedicated space for an ergonomic studio setup can revolutionize your workflow.
Soundproofing: Keeping Noise In (and Out)
A critical distinction: acoustic treatment manages sound within your studio. Soundproofing blocks sound from entering or leaving your studio. You can have a perfectly treated room that still leaks sound like a sieve, or a perfectly soundproofed room with terrible internal acoustics. You generally need both.
1. Insulation: The Mass Barrier
- Dense Materials: Filling walls, ceilings, and floors with dense insulation like mineral wool or specialized fiberglass batts significantly reduces sound transmission. The more mass, the more sound energy is absorbed and blocked.
- Mass-Loaded Vinyl (MLV): This heavy, flexible material can be added to walls, floors, or ceilings to dramatically enhance sound blocking without adding excessive thickness.
2. Sealing: Plug the Leaks
Sound behaves like water – it will find the smallest crack to escape or enter. Sealing all gaps is paramount.
- Doors & Windows: The weakest links. Use acoustic caulk to seal gaps in drywall. Install robust weatherstripping around door and window frames. Employ door sweeps or acoustic door seals at the bottom of doors. Consider upgrading to solid core doors or even double doors. For windows, double or triple-pane glass is ideal, or add a secondary pane of glass with an air gap.
- Outlets & Light Fixtures: These are direct breaches in your wall. Use acoustic putty pads behind electrical boxes and seal around fixtures with caulk.
3. Decoupling: Breaking the Connection
Sound travels through vibration. Decoupling physically separates surfaces to prevent these vibrations from transferring.
- Resilient Channels & Isolation Clips: These are used to "float" drywall from the main wall studs, creating an air gap that breaks the vibrational path.
- Floating Floor Systems: For floors, a floating floor (a subfloor that sits on isolators, separated from the main building structure) is the ultimate solution to prevent impact noise and low-frequency rumble.
A comprehensive soundproofing strategy combines these techniques, meticulously addressing every potential sound transmission pathway.
Equipment Selection: Tools of the Trade
While acoustics reign supreme, the right equipment complements a great room. Choose wisely based on your specific needs.
- Microphones: Your Ears to the World
- Condenser Mics: Ideal for capturing detailed vocals, acoustic instruments, and nuanced sounds due to their sensitivity and wide frequency response.
- Dynamic Mics: Robust and handle high sound pressure levels (SPLs) well, making them excellent for drums, electric guitar amps, and live vocals.
- Polar Patterns: Consider cardioid, omnidirectional, or figure-8 patterns based on your recording situation. Understanding microphone mastery will greatly enhance your recordings.
- Monitors: The Unvarnished Truth
- Flat Frequency Response: Prioritize monitors that offer a flat and uncolored frequency response. This means they reproduce audio as accurately as possible, without boosting or cutting certain frequencies, giving you a true picture of your mix.
- Woofer Size: Match the woofer size to your room. For small rooms, 5-6 inch woofers are often sufficient. For larger rooms where you need more low-end presence, 8 inch+ woofers might be appropriate. Get a deeper dive into studio monitor showdown to make the right choice.
- Audio Interface: The Heart of Your Digital Studio
- Inputs/Outputs: Choose an interface with enough inputs and outputs for your current and future needs.
- Conversion Quality: Look for high-quality analog-to-digital (A/D) and digital-to-analog (D/A) converters for pristine audio capture and playback.
- Low-Latency Performance: Critical for recording with effects or virtual instruments without noticeable delay.
- Compatibility: Ensure it's compatible with your Digital Audio Workstation (DAW) and operating system. Mastering your digital audio workflow starts here.
- Overall Investment: Prioritize compatibility, connectivity, and value. Don't cheap out on cables; high-quality, properly shielded cables prevent noise and interference.
Beyond Sound: Lighting & Ergonomics for Sustainable Creativity
Your studio isn't just a place for sound; it's a place for sustained work and creativity. Environmental factors like lighting and ergonomics play a huge role in your comfort, focus, and long-term health.
Illuminating Your Workspace
- Task Lighting: Use adjustable, warm (around 3000K), dimmable LED lighting for specific tasks. This reduces eye strain during intricate work.
- Overhead Lighting: Should be diffused and gentle, avoiding harsh glares.
- Bias Lighting: Placing a soft light strip behind your monitors helps reduce eye fatigue by minimizing the contrast between your bright screen and a dark wall.
- Avoid Flicker: Steer clear of flickering fluorescent lights, which can cause headaches and eye strain.
- Natural Light: Manage natural light with curtains or blinds to prevent glare on screens and to block unwanted external light during critical listening or recording sessions.
Ergonomics: Comfort Meets Productivity
- Adjustable Furniture: An adjustable, ergonomic chair with excellent lumbar support is a non-negotiable investment for long hours. Pair it with a height-adjustable desk to allow for both sitting and standing, promoting better posture and circulation.
- Monitor Height: Ensure your computer monitors are at eye level to prevent neck strain.
- Organized Layout: Arrange your equipment to minimize reaching and repetitive movements. Keep your most used controls close.
- Cable Control: Beyond aesthetics, organized cables reduce clutter and trip hazards.
- Anti-Fatigue Mats: If you spend a lot of time standing, an anti-fatigue mat can provide crucial comfort and support.
DIY vs. Professional: When to Call in the Experts
You don't need to be an acoustician to make significant improvements to your studio.
- DIY Solutions: For budget-friendly options and addressing common issues, a DIY approach can be very effective. Foam panels, strategically placed rugs, thick blankets, well-stocked bookshelves (acting as diffusers), and even large plants can contribute to reducing reflections. There are many great guides for DIY soundproofing secrets to get you started.
- Professional Solutions: When should you invest in professional help?
- Precise Sound Engineering: If you're aiming for a truly world-class, critically accurate listening environment (e.g., for mastering or professional film scoring).
- Tricky Spaces: Irregularly shaped rooms, spaces with severe bass issues, or multi-purpose rooms can benefit immensely from custom, scientifically designed solutions.
- Optimal Performance & Aesthetics: Professionals can provide tailored designs that not only function perfectly but also integrate seamlessly with your studio's aesthetic.
Advanced Techniques: Fine-Tuning Your Sonic Space
Once the foundational treatments are in place, advanced techniques can push your studio's performance even further.
- Diffraction and Studio Resonance Control: These techniques delve deeper into managing how sound waves bend around objects (diffraction) and tackling specific problematic frequencies (room modes or resonances). Addressing these ensures uniform sound perception across your room, improving stereo separation and reducing "honky" or "boomy" spots.
- Room EQ Software (e.g., Sonarworks SoundID Reference, REW): Even with excellent passive acoustic treatment, every room has slight frequency anomalies. Room EQ software uses a measurement microphone to analyze your room's acoustic response, then creates a digital correction curve that you apply to your monitoring chain. This can flatten out minor peaks and dips in your frequency response, giving you an even more accurate listening experience and ensuring your mixes translate better to other systems.
Building Your Sonic Sanctuary
Creating an optimized acoustic environment is a journey, not a destination. It's an ongoing process of listening, evaluating, and refining. Start with the basics: identify your first reflection points, tame the bass in your corners, and optimize your monitor placement. You'll likely be astonished by the immediate improvement in clarity and accuracy.
Remember, the goal isn't to create a perfectly "dead" room, but a balanced one where sound is clear, natural, and inspires creativity. By understanding how sound behaves and applying these proven principles of acoustic environment and studio design, you're not just improving your recordings – you're building a more productive, enjoyable, and honest creative space.
And if you're ready to dive even deeper into the world of sound design and studio optimization, explore the Temple of Boom for more advanced insights and strategies. Happy recording!